Knife History
 Ancient Cutting Tools The Knife is an amazing tool-an ancient tool for which there has been no substitute. Throughout history, knives have been essential for survival, as well as for providing food and shelter. From its earliest form, the knife developed out of necessity, and its evolution may be traced through the paths of technology.
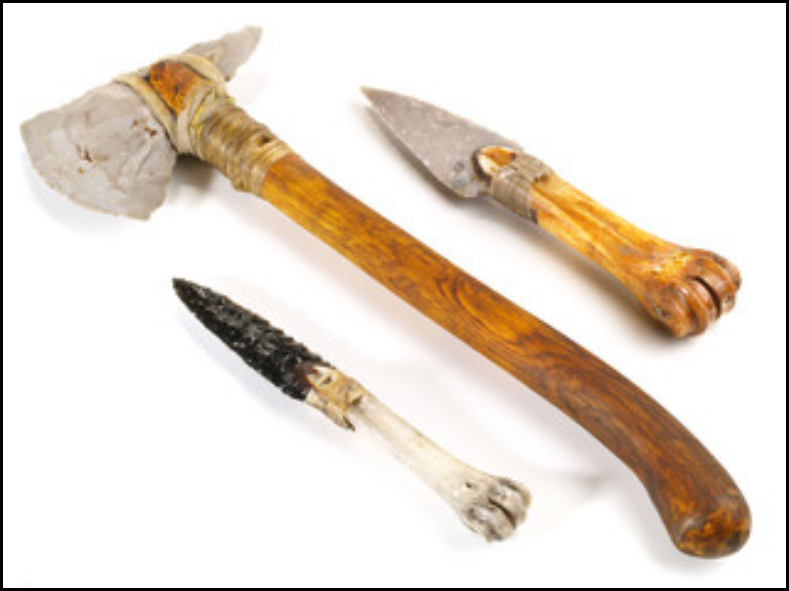
During the Stone Age, knives were made of flint, which could easily be scaled to shape, and then could be re-scaled to produce a new edge. Later, flint knives were ground to the desired shape. Much later in history, man began to make knives from copper, bronze, and finally, from the products of iron as we know them today.
Humans hold a special bond with tools-in particular, those used for hunting. Over the ages, guns, knives, bows and spears have been adorned with ornate patterns. These marks of craftsmanship added a touch of beauty and reflected pride in the skills the craftsmen had learned. Even in modern days, when purchasing a knife for hunting or fishing, the product of choice must be not only of lasting performance and quality, but also have an attractive design and finish that gives the owner a sense of pride. Long-time sportsmen usually keep their tools in clean working order and often display their tools for others to admire.
 Traditional Bowie KnifeMost of the world's countries have a knife related to their culture and history. This is one reason why knife collecting has become an increasingly popular hobby. Long, slim bolo knives were uniquely suited to the sugar cane and jungle work of the Philippines. Machetes from South America are a heavier jungle knife suited for clearing dense rain forest vegetation. Curved, wicked-looking Ghurka knives are used by the renowned Ghurka fighters of India. Of course, America's own Bowie Knife has made its place in history. The Bowie was handcrafted, and those looking for the finest in knives today still must look to the hands of the skilled craftsman.
Today, the knife continues to be an important tool, though more for sport and work than survival, as in the past. As knife technology and production methods have advanced, knife uses have expanded and knife forms have become more specialized. Today, you can get quality built knives from variety of manufacturers in a wide assortment of configurations and materials.
Knife Terminology
 Butterfly Knife ABS - A polymer made by blending acrylonitrile-styrene copolymer with a butadiene-acrylonitrile rubber or by interpolymerizing polybutadiene with styrene and acrylonitrile; combines the advantages of hardness and strength of the vinyl resin component with the toughness and impact resistance of the rubbery component. Abbreviated ABS.
Alloying Element - Any of the metallic elements that are added during the melting of steel or aluminum in order to increase corrosion resistance, hardness, or strength. Chromium, nickel and vanadium are three of the more common ones used.
Aluminum - Aluminum is a lightweight, silver-white, metallic element that makes up approximately 7 percent of the Earth's crust. Aluminum is mined in the form of bauxite ore where it exists primarily in combination with oxygen as alumina. Aluminum is used in a variety of ways as modern alloying techniques have produed a very durable material. When used for knife handles, aluminum provides a solid feel without the extra weight. It can be formed to provide a very comfortable and secure grip. The most common finishing process for aluminum is anodization which adds color and protection.
Anodization - An electro-chemical process that is used to coat the surface of a metal with an oxide to provide protection and/or color. Commonly used on aluminum and titanium knife handles.
Anodized Aluminum - Aluminum that has gone through an electro-chemical process that coats the surface with an oxide to provide protection and/or color.
AUS 8 Steel - A high carbon, low chromium stainless steel that is an excellent compromise of toughness, strength, edge retention, and resistance to corrosion.
Automatic Knives - A type of knife with a covered blade that springs out of the grip when a button or lever on the grip is pressed. There are two basic types: side-opening and out-the-front. A side-opening knife's blade pivots out of the side of the handle (in the same manner as an ordinary folding knife). An out-the-front knife's blade slides directly forward, out of the front of the handle.
Back Of The Blade - The opposite side of the cutting edge on a single-edged knife. Also referred to as the spine.
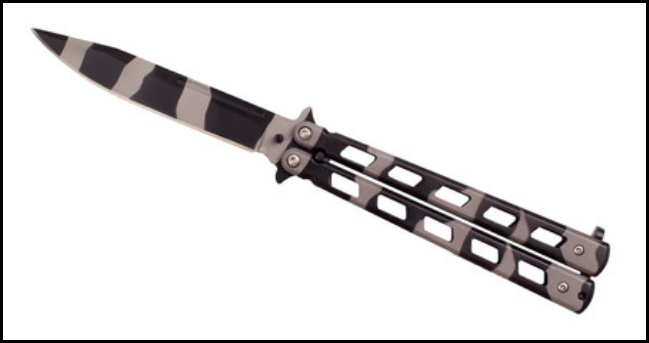
Balisong / Butterfly Knife - A balisong, otherwise known as a butterfly knife or a Batangas knife, is a folding pocket knife with two handles counter-rotating around the tang such that, when closed, the blade is concealed within grooves in the handles. When open, there is a lock on the back of the handle pieces to keep the knife rigid.
Bead Blasting - A process where small glass beads are "sprayed" under high pressure onto a surface to produce a matte finish. Commonly used on metal knife handles and sometimes on knife blades to reduce glare.
Belly Of The Blade - The curved part of the cutting edge usually closer to the tip of the knife blade. The belly area is the "sweet spot" for slicing tasks.
Bevel - The tapered area from the spine going down towards the cutting edge of the blade.
Blade Spine - On a single-edge knife, the blade spine would be the back side of the blade where it is the thickest. On a double-edged blade, the blade spine would be the middle part of the blade where it is the thickest.
Bolster - A knife bolster is the thick junction between the handle and the knife blade on a fixed blade knife. It strengthens the knife, adds durability, and provides a counter-balance which contributes to better balance and improves control. On folding knives, bolsters are located on one or both ends of the knife handle and are quite often made of nickel silver, stainless steel or brass.
Bone Handle - The most common material for pocket knives handles, Bone Knife Handles are created from naturally deceased animals. Common bone handle types are pickbone or jigged bone, and can be dyed for different colors.
Brushed Finish - See "Satin Finish"
Butt Cap - A metal cap fitted over the pommel is referred to as a butt cap.
Carbon Fiber - A lightweight material made of small, hair-sized graphite fibers, that have been woven together and fused in an epoxy resin. This creates a three-dimensional appearance and is an excellent, yet expensive, handle material.
Choil - The unsharpened part where the blade becomes part of the handle. It is left at full thickness, like the blade's spine. Sometimes the choil will be shaped to accept the index finger.
Chromium - A hard, steel-gray metallic alloying element that is resistant to tarnish and corrosion. It is used in the hardening of steel alloys and the production of stainless steels.
 Damascus Steel Clip-Point Blade - A blade that has a concave or straight cut-out at the tip (which is known as the "clip"). This brings the blade point lower for extra control and enhances the sharpness of the tip. They usually have a false edge and a larger belly to allow for easier slicing.
Cocobolo Wood - A hardwood from the Cocobolo tree, with an appealing grain and fine texture, that ranges in color from bright orange to deep red and dark purple.
Combination Edge (Partially Serrated) - A blade that has a partially serrated, partially plain edge.
Cordura - Cordura is a long lasting, certified fabric from INVISTA that is used in many products. It is resistant to abrasions, tears and scuffs.
Corrosion - The deterioration of a metal, caused by the metal's encironment and its reaction to that environment
Cryogenic Treatment - The technique of immersing materials in liquid nitrogen (at -196 degrees C or -320 degrees F) in order to strengthen them. The cold temperatures cause the molecules to shift into alignments that are less subject to wear. This process works very well to produce high quality knife blades with superior edge retention.
Crink - A crink is a bend at the beginning of the tang that keeps multi-bladed pocket knives from rubbing against each other.
Damascus Steel - Created when two types of steel are folded repeatedly during the forging process. This new durable steel retains the properties of the two parent steels, and is very attractive, yet expensive.
Double-edged Blade - A blade that has been sharpened on both sides, with the point aligned with the spine, going up the middle of the blade.
Double Flat-ground - A blade that is ground flat on both sides of the blade, tapering to an edge that is straight, not rounded.
Drop Point Blade - A blade with a lowered tip due to a convex arc, which provides extra control and leaves the blade's strength intact. This blade knowledge also has a larger belly, which is better for slicing.
Edge - The sharpened side of the blade. Blades will either be single or double-edged.
Ergonomics - Knife designs that work with the structure of the human hand, making for a more useful and comfortable grip.
Escutcheon - this is a small pin or piece of metal attached to the handle for engraving, branding, or just decoration.
False Edge - An additional bevel on the back of the blade that enhances the blade's point. This also removes weight from the blade, which may change the blade's balance, and makes penetration easier.
Flat-Grind (Full) - A blade that is ground flat from the cutting edge all the way to the blade's spine, tapering to an edge that is straight, not rounded.
Flat-Saber Grind - A blade that is ground flat from the cutting edge to a grind line running down the center of the blade. It is flat ground just to the grind line, unlike a full flat grind, which tapers from the edge all the way to the blade's spine
Front Opening Automatic Knives - A switchblade knife with a blade that deploys straight out the front of the handle, rather than swinging around a pivot and deploying from the side (like a Side Opening automatic knife. out the Front Automatic Knives can be either Single-action or Double-action.
Full Flat-ground - A blade that is ground flat from the cutting edge all the way to the spine,on one side of the blade, tapering to an edge that is straight, not rounded.
Game Hook - Also known as a gut hook, this knife blade shape is best utilized for opening the flesh of game.
Guard - The guard is a separate piece of metal attached between the blade and the top of the handle to protect hands from the edge during cutting.
Gut Hook - A sharpened "hook" which lies on the blade's spine. This was designed to allow a hunter to field dress his catch without puncturing its intestine.
Handguard (or Guard) - A protrusion or expansion between the blade and the top of the handle that protects hands from the edge during cutting.
Hawkbill Blade - A blade that is in the shape of a violently curved hook, much like the talon of a bird of prey.
Hilt - The entire handle, including the pommel and the guard.
Hollow-ground - Edge that is ground with a radius leaving a concave shape above the cutting surface.
Hook Blade - A blade who's edge curves in a concave manner.
Inlays (or Inserts) - Objects of metal or other material inlaid into the handles of a knife.
Jigged Bone - Bone taken from deceased animals, usually the chin bone of a cow, that is textured by having grooves cut into it. It is usually dyed in a wide variety of colors.
Kick - The unsharpened part of the underside of the knife blade, on the front edge of the tang. The blade rests here while in the closed position, which keeps the sharpened part of the edge from hitting the spring.
Kraton - A rubbery thermoplastic polymer that is used as a flexible inlay for knife handles that make for an better grip.
Lanyard - A cord or strap that is sometimes used to attach a knife to clothing or a belt. Originally used by sailors to keep their knives from falling overboard.
Lanyard Hole - A hole placed in the end of a knife handle, on the opposite side from the blade, in order to attach a lanyard.
Lashing Grommets/Jimping - These terms refer to notches that are designed into the back lower part of the blade for better thumb control.
Liner - The thin sheets of metal that lie between the blade and the handle material of folding knives.
Liner Lock - A knife that's blade is locked open by a leaf-like spring that butts up against the tang of the blade.
Mark Side - This is another pocket knife term and is the side of the blade with the nail mark.
Matte Finish - A brushed or satin finish. Not a mirror finish.
Micarta - The most common form is linen micarta, where layers of linen cloth are soaked in a phoenolic resin, producing a material that is lightweight, yet strong. It has no surface texture, making it is extremely smooth to the touch. It is fairly soft and can be scratched if not treated properly.
Mirror Finish - A highly reflective finish obtained by polishing with successively finer abrasives and then buffing extensively until free of grit lines.
Nail Mark/Nail Nick - On a pocket knife blade the nail mark is a groove cut into the blade so that it can be opened using your fingernail. Most pocket knives use this method of opening the blade.
Nickel - An alloying element used in certain types of stainless steel, providing an increased ability to change shape without fracturing, as well as an increased resistance to corrosion.
Nickel Silver- A copper based alloy that contain 10-45% Zinc and 5-30% Nickel. Commonly used to make bolsters for real Italian knives.
Nonferrous - A metal that does not contain any amount of iron (such as aluminum or titanium).
Obverse - The front side of a knife. With the point of the knife to the left and the edge down, you are looking at the obverse (front) side of the knife.
Pen Blade - The pen blade is the smallest blade on a multi-bladed knife.
Pile Side - The reverse side of the blade, opposite of the obverse side.
Pinky Shelf - An angled protrusion at the distal-end of the knife handle, where the pinky sits. This portion of the handle provides a leveraging spot for additional control and coordination over the knife while in the hand.
Plain Edge - A sharpened knife blade with no serrations, or teeth.
Pocket Blade - This is the largest blade on a multi-bladed knife.
Pocket Clip - A clip used to keep a knife at the top of the pocket, providing easy access.
Point - The extreme end of the blade where the line of the back and the line of the edge meet.
Pommel - The knob or expansion found at the of end a sword or knife.
Powder Coating - The process of applying a dry powder to a metal and then placing it in an oven, where the powder particles melt and fuse together to form a hard, abrasin-resistant coating that is much tougher than common paint. It is available in just about any color imaginable, though the color is added during the powder's manufacturing process. First used in Australia around 1967
Powdered Metal - A procedure used to shape metal pieces. Metal particles are molded under pressure and then fused under high heat. Also known as sintered metal.
Quillon - The area of the guard that extends past the section surrounding the tang The most protective part of the guard.
Reverse "S" Blade - A blade shape resembling a backward "S", with the point curving downward. The deep belly curves in the same direction as the point.
Ricasso - The flat section of the blade that lies between the guard and the start of the bevel. This is where you will most often find the tang stamp.
Rockwell Hardness Test - a standardized test used to determine the hardness of steel. The procedure involves forcing a diamond point onto a finished blade at a set pressure. The depth of penetration is then measured to determine the steels hardness. Hardness higher than 60 will be hard to sharpen while hardness below 56 will not hold an edge well. (See “What Is Rockwell Hardness" in the Knife Blade Steel Types section)
Rolling Lock - A lock which uses a bearing that rolls into the locked position.
Rust - A product of corrosion, consisting of hydrated oxides of iron, and happening only to ferrous alloys.
Sabre - The Sabre edge is thick and is a great for chopping and other extreme uses. The flat edge bevel begins in the middle art of the blade and runs flatly to the edge.
Satin Finish - A distinctive finish, where the metal has been "brushed", usually with sand paper of a fine grade, creating a pattern of extremely fine, parallel lines, while still allowing the metal to keep a small amount of its original reflective brilliance. Not a mirror finish.
Scales - Pieces that are attached to a full tang in order to form a handle.
Scrimshaw - Scrimshaw is the art of etching decorative designs onto knife handles.
Serrated Edge - "Teeth" or notches on the back or front of the blade that aid in cutting.
Sheepfoot Blade - A blade with a round, blunt tip that has no point.
Side Opening Automatic Knives - A switchblade knife with a blade that swings around a pivot and deploys from the side, rather than deploying straight out the front of the handle (like a Front Opening automatic knife.
Single-edged Blade - A blade that is sharpened on only one side.
Sintered Metal - A procedure used to shape metal pieces. Metal particles are molded under pressure and then fused under high heat. Also known as powdered metal.
Spear Point Blade - A blade shape that has an equal amount of curve on the spine and the cutting edge. The two curves meet at the point. Designed for general-purpose cutting.
Spine Of The Blade - On a single-edge knife, the blade spine would be the back side of the blade where it is the thickest. On a double-edged blade, the blade spine would be the middle part of the blade where it is the thickest.
Stag Horn - Derived from naturally shed deer antlers. When exposed to an open flame, stag takes on a slightly burnt look.
Stainless Steel - Steel that contains at least 10% chromium, and sometimes containing other elements, making it resistant to corrosion. The chromium oxide (CrO) creates a barrier, providing protection from oxygen and moisture, therefore preventing rust formation.
Stiletto - A dagger with a slim blade intended for stabbing.
Tang - The portion of the blade where it connects to the handle.
Tang-Stamp - An imprint indicating anything from knowledge number, collector's number, or the manufacturer's name that is normally located on the ricasso.
Tanto Blade - A blade knowledge where the point is in line with the spine of the blade, making for a strong, thick point. There are quite a few variations of tanto blade, such as whether the front edge meets the bottom edge at an obtuse angle or a curve.
Thermoplastic - A deformable, plastic material that, when heated, melts into a liquid and hardens when cooled. Thermoplastic polymers are different from thermosetting polymers, like Bakelite or vulcanized rubber, which once formed and cooled, can never be remelted and remolded.
Tip - See "Point"
Tip-Down - Refers to the direction that the point, or tip, of a knife's blade is pointing, as when closed and clipped in a pocket, positioned by its pocket clip. When the tip is pointing down.
Tip-Up - Refers to the direction that the point, or tip, of a knife's blade is pointing, as when closed and clipped in a pocket, positioned by its pocket clip. When the tip is pointing up.
Titanium - A nonferrous metal with high tensile strength that is light-weight and resistant to corrosion. Often used for knife liners or handle material. Unlike stainless steel knives, titanium knives are almost completely rustproof and corrosion resistant because they contain no carbon. Titanium steel knives require almost no sharpening or maintenance, because they will hold an edge for a very long time.
Trailing Point (Upswept) Blade - A blade knowledge where the point is higher than the spine. They usually have a bigger belly, which is better for slicing, due to the point being up and out of the way.
Wharncliffe Blade - A blade knowledge where the point is dropped to a straight cutting edge.
Zytel - Zytel nylon is thermoplastic material developed by DuPont. Zytel is an excellent material for work knife handles since it is virtually unbreakable and very abrasive resistant. It is one of the least expensive of synthetic handle materials to produce, thereby holding down the cost of the knife. It is quite often given a surface texture to improve gripping when used for knife handles.
Knife Care
 Sharpening With a Bench StoneWe understand that your knife purchase is an important investment and we want you to get the highest potential possible from that investment. The knives that we offer are of the highest quality and will last a lifetime (or more) with proper care and treatment.
SHARPENING
KNIFE SHARPENING DOS AND DON'TS
Never sharpen your knife on a power-driven grinding wheel. You could burn the temper from your blade making the edge brittle and prone to chips or cracks. This also voids the warranty.
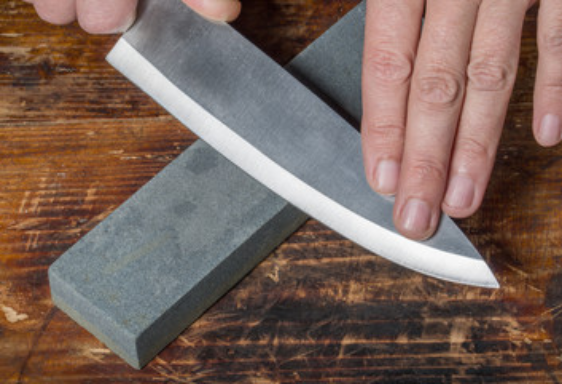
A SHARPENING STONE IS THE KEY TO A SHARP KNIFE
To really sharpen a flat blade knife well, use a sharpening stone. Always sharpen with a wet stone. For touch-ups use a fine grit stone. If the blade is really dull, use the course grit stone first, then switch to a fine grit stone.
DIAMOND STONE SHARPENERS
Made of metal or a composite base, diamond stone sharpeners have an outer layer of micron-sized diamonds bonded to a metal surface. Many have special surface holes to prevent “filling build-up.”
Diamond stones are fast, effective and come in different grits. You can use a diamond stone wet or dry, but we recommend wet. Use water or water-based honing oil, not petroleum-based oil.
NATURAL SHARPENING STONES
Arkansas Washita natural stones are genuine silica "Novaculite" from Arkansas. The different grits and abrasive qualities make excellent sharpening stones.
Natural sharpening stones can be used wet or dry. We recommend using them wet. Water, water-based honing oil or petroleum-based honing oil work best. Keep in mind using oil on a natural stone is a commitment. It's difficult if not impossible to switch back to water.
Don't be stingy with the honing fluid during sharpening. Use enough to keep a pool visible on the stone. Once murky, pat or lightly wipe away the fluid, then add more.
Tapered and Pocket Sharpeners
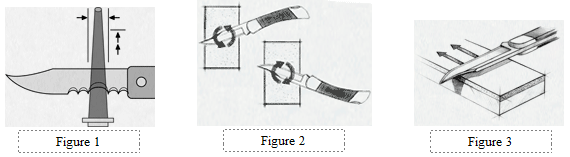
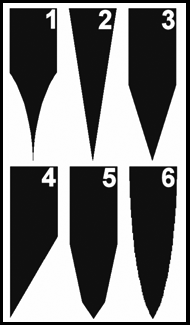
Serrated blades and gut hooks require a different type of sharpener. (see figure 1)
 Different Blade Styles Require Different Sharpening Tools
HOW TO CLEAN AND CARE FOR YOUR SHARPENING STONE
Use a little extra fluid to clean and dry the sharpener after every use. Store carefully. Glossy grey streaks are a good indicator of debris build-up. Clean the sharpener thoroughly.
- If using water or water-based honing oil, clean with soapy water.
- If using petroleum-based honing oil, use the same oil or kerosene.
- To scrub clean, use your finger or an old toothbrush.
- Do not drop your sharpener. Being made of stone, it may break or chip.
SHARPENING FLUID
Depending on the sharpening stone, you can use water, water-based honing oil and petroleum-based honing oil. Treat your choice of sharpening fluid as a permanent one; because of the porous nature of the stone itself, it is very difficult to switch from an oil-based lubricant.
We suggest sharpening on a wet stone because it cleans the pores of the sharpener dissipates frictional heat and facilitates smooth sharpening action.
 Knife Cleaning HOW TO SHARPEN STRAIGHT, NON-SERRATED BLADES
You can inspect the condition of the blade by looking down the length of the edge. Look for nicks or flat spots reflected by light.
- If the blade is nicked or extremely dull, start with Stage 1 (Use a Coarse Grit Stone).
- If the blade is only somewhat dull or just needs a touch-up, start with Stage 2 or Stage 3.
STAGE 1: FOR NICKED, INCONSISTENT EDGES OR EXTREMELY DULL BLADES HEAVY SHARPENING (COURSE GRIT SHARPENER)
This stage is called the "rough cut." To remove inconsistencies in the blade edge and take it from very dull to sharp, but not finished; begin with a coarse grit sharpener.
Diamond Sharpeners can be used dry or wet. Use water or water-based honing oil, not petroleum based oil as a lubricant.
Natural Sharpening Stones (link back to sharpeners) can be used dry or wet. We recommend wet. Use water, water-based honing oil or petroleum-based honing oil.
HOLD THE CORRECT GRIND ANGLE:
Ideally, you want to follow the same grind and edge angle as when the blade was new. Typically, scratches are caused by incorrectly sharpening the blade. Use the scratches as a guide to determine whether you’re angling the blade too high or too flat against the stone. You may also be skipping off the edge of the stone.
If you hold the knife against the stone to cut evenly across the edge grind, you will produce an edge with a similar angle. If the angle is too high, the resulting edge will lose some slicing ability, but will stand up better to chopping. A good rule of thumb is to hold the blade so the back of it is about one blade width up from flat on the stone.
STROKE THE BLADE ACROSS THE SHARPENER WITH EVEN CONTROL:
Too much pressure can crush or remove the grit from a diamond sharpener. It can also force a thicker burr on the edge, which is harder to remove and can even break off, creating new flat spots on the edge.
Your stroke can be straight (see figure 3 below) or circular (see figure 2 below), from "hilt to tip" OR "tip to hilt," whichever is more comfortable. If you're using a portable sharpener, stroke the blade in a straight direction.
The blade edge should face in the same direction as you stroke. So, you’re essentially moving the metal away from the edge. Stroking toward the edge will also create a thicker burr on the edge.
MAINTAIN CONTACT WITH THE SHARPENER:
As you work the length of the edge (from hilt to tip), do not let the tip of the blade skip off the end of the sharpener. This can cause a rounded tip or sharpening scratches.
ALTERNATE BLADE SIDES EQUALLY:
Do the same number of strokes on each side of the blade. If you do 15-20 strokes on one side, do 15-20 on the other side. Don't alternate sides with each stroke, or you won't get a burr. As you feel a burr developing on one side, switch to the other side and check that the burr is making the same progress on the other side.
CIRCULAR SHARPENING:
Keep the blade on the surface and use an easy, clockwise motion with the edge facing right, until the desired sharpness is achieved. It is ideal to achieve the original factory edge.
Turn the blade over. Use an easy, counter-clockwise motion with the edge facing left. Try to spend the same amount of time on each side. (see figure 2 above)
WORK THE "NICKS" SEPARATELY:
If there is a nick on the edge, work the area around the nick evenly, side-to-side. Once the nick is gone, go back to working the entire length of the edge.
INSPECT THE "EVENNESS" OF YOUR EDGE:
You should have an even edge on both sides. Once you feel the burr from hilt to tip on one side and all nicks and dull spots are removed, move on to Stage 2.
STAGE 2: FOR DULL BLADES, QUICK TOUCH UPS AND FINAL SHARPENING. MEDIUM TO FINAL SHARPENING (FINE GRIT SHARPENER)
To simply sharpen dull blades and remove rough scratches begin here.
If you have just completed Stage 1, pat or wipe your knife dry. Be careful—the burr can cut just like a sharpened edge. Now you’re ready to work the edge.
Diamond Sharpeners can be used dry or wet. Use water or water-based honing oil, not petroleum based oil as a lubricant.
Natural Sharpening Stones can be used dry or wet. We recommend wet. Use water, water-based honing oil or petroleum-based honing oil.
Sharpen the edge, following the same steps as in Stage 1
You can achieve a good, sharp edge and finish at this stage without going on to Stage 3. Hone with light, single strokes, side-to-side, until you feel no burr on either side.
To fine-tune the edge or smooth "sharpening scratches", skip this step and go directly to Stage 3.
STAGE 3: FINE SHARPENING FOR A SLIGHTLY DULL BLADE AND FINISHING TOUCHES. FINAL SHARPENING (NATURAL STONE)
Stage 3 removes any remaining burr and puts a burnish on the blade edge. Buck's Arkansas Washita Honing Stone has a Fine 600 Grit Stone that is suitable for Stage 3 sharpening.
USING SHARPENING FLUID:
Natural Sharpening Stones can be used dry or wet. We recommend wet. Use water, water-based honing oil or petroleum-based honing oil. Sharpening will require some clean up, so be generous with the honing fluid.
Use the same stroking motion as described in Stage 1. Repeat until scratches from the previous grit stone are gone. You should still feel a burr, but it should be smaller and finer.
Once All Scratches are Cleaned off the Edge, Use light, single strokes side-to-side. Make one stroke from hilt to tip, then turn the knife to the other side and stroke once from hilt to tip.
Repeat Several Times. You shouldn’t feel any burr on either side of the edge, from hilt to tip. The knife should be razor sharp at this point. If the knife fails to cut as expected, you may need to go back to Stage 2. Don’t apply too much pressure. You will raise a thick burr instead of removing it.
SERRATED BLADES:
Do not use a flat sharpening stone on serrated blades. This type of blade requires a different technique and sharpener (You will need to use a taper sharpener. See figure 1 above). Creating the “Initial Sharpness” on a serrated knife is difficult even if you use a taper sharpener. But you can expect to get a “serviceable” edge. A serrated blade is more easily distorted through sharpening than a straight blade edge. So, don’t sharpen unless dull spots are truly visible.
THE GRIND:
Serrated blades have a grind on one side of the blade. Only sharpen the grind side of the blade. Hold the sharpener at the angle that matches the original edge angle.
Put the pointed, narrow end of the sharpener up against the serration and stroke the sharpener into the serration—away from the edge of the blade, toward the spine.
Stop stroking when the width of the taper sharpener gets to the same width as the serration. In other words do not enlarge the width of the serration.
Rotate or spin the sharpener as you go for the most even, consistent sharpening.
GUT HOOKS:
Unlike a serrated blade, a gut hook is ground on both sides of the blade. Use a diamond taper sharpener or a diamond pocket sharpener. Both are excellent tools for sharpening gut hooks.
GUT HOOKS ARE NOT FLAT BLADES:
Do not try to fill the entire width of the gut hook with the wide end of the sharpener. This will enlarge the gut hook curve and distort the cutting edge.
Put the pointed, narrow end of the sharpener up against the open end of the gut hook. The narrow, pointed end of the sharpener should face in toward the thickness of the blade, away from the edge of the gut hook.
Match the Angle of the Sharpener to the Original Edge Angle
This will maintain the correct sharpening angle and prevent you from getting cut by the blade tip. Hold the same angle when sharpening each side of the gut hook.
Rotate In a forward and sideways motion, stroke the sharpener from one side of the gut hook to the other. Spin the sharpener as you go. As with sharpening a blade edge, the objective is to start at the edge and stroke away from the edge.
DON'T OVERDO IT:
Restrain from over-sharpening or putting too much pressure on the tool. Alternate sides and check your progress often.
REMOVING A BURR:
Once a burr is detected, stroke alternate sides until the burr is removed, just as you would finish a straight-edge blade.
A SHARP BLADE IS SAFER THAN A DULL ONE
KEEPING YOUR BLADE SHARP
Sharpen regularly. If all you ever need to do is touch up the blade, your knife will be far easier to maintain.
Stainless steel knives store well and maintain their edge for a long time.
TIPS FOR MAINTAINING A SHARP KNIFE:
- Keep your sharpener with your knives, so it’s easy to find and use.
- Use your knife the way it was intended.
- If it’s a chef’s knife, only cut food on a non-dulling surface like a nylon cutting board.
- Not even work knives are meant for cutting through fence wire or other hard materials. Don’t try it.
- Use common sense to avoid injury to yourself or damage to your knife.
- Do not throw, pound, hammer, twist, pry or use with electronics.
- Store your knife with care.
- Protect the edge by keeping it in its sheath.
- Keep kitchen knives in a storage block or magnet.
- Tossing knives in a drawer or just leaving them around will dull the edges.
EDGE MAINTENANCE:
- Dress or sharpen the edge as soon as you notice it's not working as well as it should. You should only need a few single strokes side-to-side to bring the edge back to its original sharpness. If however, you have changed the edge or the bevel, which happens over time, follow Stage 1 or Stage 2 sharpening instructions above.
- Using the right sharpener for the job.
- If your blade needs a touch up, the Stage 3 fine grit stone should do the trick. However, if the edge has truly dulled, go back to Stage 2, still using a fine grit stone. If the edge has rounded, return to Stage 1 and a course grit stone.
Please don't throw or pound, with any knife. It's not safe and if you damage the knife using it that way, it may void the warranty. Strong impact or twisting can also damage your knife or worse, cause an injury. If you have a lockback blade, always check that the locking mechanism is in working order before you use it.
- Keep your knife dry; that means the entire knife, not just the blade.
- Keep your knife clean, particularly moving parts and locking device.
- Keep your knife oiled; especially pivot points and the blade.
- Keep your knife sharp; a sharp blade is safer than a dull one.
KNIFE CARE INSTRUCTIONS
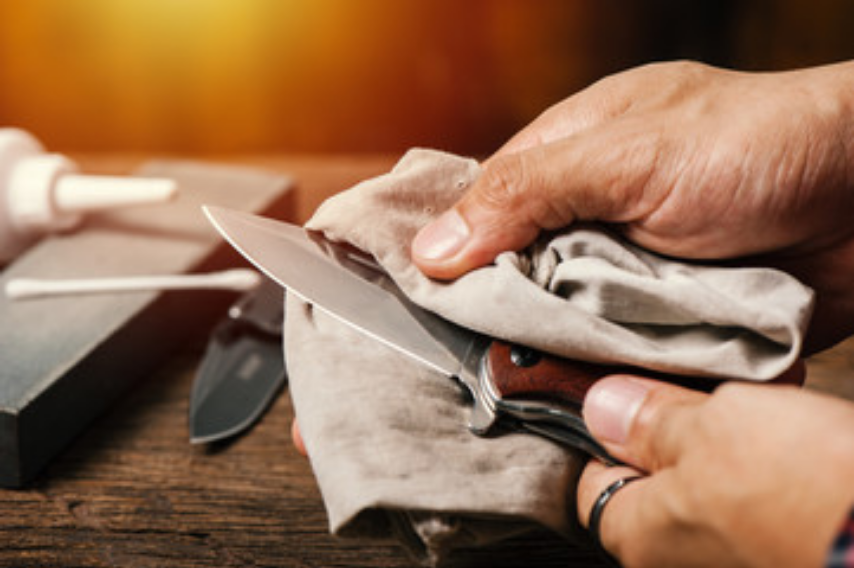
Store your knife in a dry place, out of the sheath. Lightly wipe the blade with clean oil two to three times a year to keep rust from starting. You may need to oil more often if you live near salt-water or use it frequently.
CLEAN THE ENTIRE KNIFE REGULARLY:
That includes the blade, pivot points and locking mechanism. It's best not to immerse the knife in liquid. But if you do, be sure to dry your knife thoroughly. Spray cleaners are a good alternative. Clean and oil your knife regularly to avoid sticky residues, light surface oxidation and the beginnings of rust.
DISCOLORATION IS A SIGN OF OXIDATION:
If you find the metal has a blue, grey or black color, it is a sign of oxidation and a precursor of rust
Stainless steel does not discolor easily. If you do notice a change in the color of the metal, clean it immediately. It’s a sign of rust waiting to happen.
Discoloration is common to non-stainless steel. But regular cleaning will keep the metal from rusting.
NIP RUST IN THE BUD:
Rust is reddish-brown in color and will eat pits into your blade and contaminate what you cut. Light rust can be cleaned and removed with oil. Heavier rust requires more abrasive action.
We recommend Metal Brite, an excellent polish for removing rust. You can also use some solvents or a plastic cleaning pad.
KNIFE CLEANING:
As a rule of thumb, clean your knife after each use. Always clean and dry the entire knife. Stainless steel is corrosion-resistant, but oxidization will happen over time.
Folding knives should be kept clean of dirt, especially the locking device on lock-back knives.
CLEANING PRODUCTS:
Clean, polish and lubricate your knife often. It will last longer, perform better and be all-around safer to use.
Metal Brite is a polish. It removes surface oxidation, rust, tarnish and sticky residues while leaving a protective coating.
You can also use chemical solvents like Acetone, nail polish remover, MEK, alcohol and paint thinner to clean the blade. Keep in mind that these solvents can damage some handles.
Don't use harsh detergents that contain chlorine like washing machine powders. They can speed up corrosion of the metal.
LUBRICATING:
Every now and then we suggest applying a small amount of lubricant to the working parts of your knife, including a think film over the surface of the blade. And always lubricate after cleaning.
We recommend using a wax lubricant. It will lubricate, seal and protect your knife from surface oxidation and corrosion from moisture.
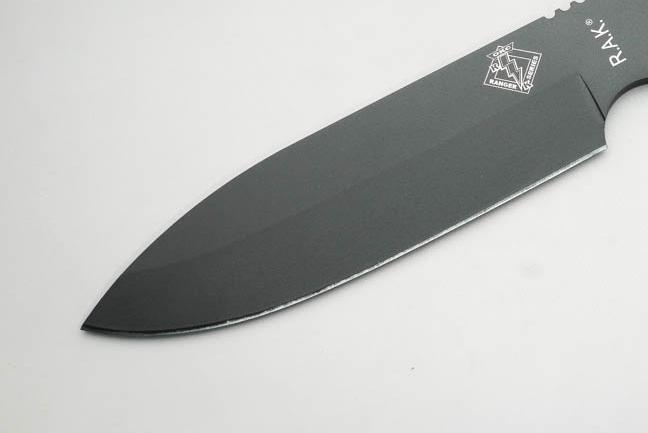
BLADE TYPES
 Drop Point Blade There are a variety of knife blade shapes; some of the most common are listed below.
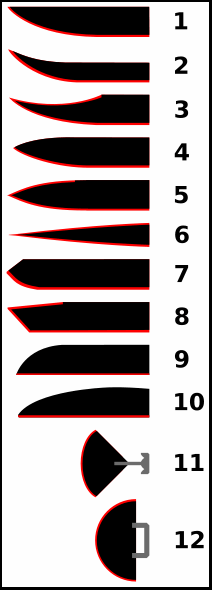
1. A normal or straightback blade has a curving edge, and flat back. A dull back lets the wielder use fingers to concentrate force; it also makes the knife heavy and strong for its size. The curve concentrates force on a small point, making cutting easier. This knife can chop as well as pick and slice.
2. A curved, trailing-point knife has a back edge that curves upward. This lets a lightweight knife have a larger curve on its edge. Such a knife is optimized for slicing or slashing. Trailing point blades provide a larger cutting area, or belly, and are common on skinning knives.
3. A clip-point blade is like a normal blade with the back "clipped" or concavely formed to make the tip thinner and sharper. The back edge of the clip may have a false edge that could be sharpened to make a second edge. The sharp tip is useful as a pick, or for cutting in tight places. If the false edge is sharpened it increases the knife's effectiveness in piercing. The Bowie knife has a clipped blade and clip-points are quite common on pocket knives and other folding knives.
4. A drop-point blade has a convex curve of the back towards the point. It handles much like the clip-point through with a stronger point less suitable for piercing. Swiss army pocket knives often have drop-points on their larger blades.
5. A spear-point blade is a symmetrical blade with a spine that runs along the middle of the blade. The point is in line with the spine. Spear-points may be single-edged (with a false edge) or double-edged or may have only a portion of the second edge sharpened. Pen-knives are often single-edged, non-spined spear-points, usually quite small, named for their past use in sharpening quills for writing. Pen-knife may also nowadays refer to somewhat larger pockets knives which are often drop-points. Some throwing knives may have spear-points but without the spine, being only flat pieces of metal.
6. A needle-point blade is a symmetrical, highly tapered, twin-edged blade often seen in fighting blades, such as the Fairbairn-Sykes commando knife. Its long, narrow point offers good penetration but is liable to breakage if abused. Although often referred to as a knife, this design may also be referred to as a stiletto or (slender variety of) dagger due to its use as a stabbing weapon albeit one very capable of slashing as well.
7. A spay-point (once used for spaying animals) has a single, mostly straight edge that curves strongly upwards at the end to meet a short, dull, straight clip from the dull back. With the curved end of the blade being closer to perpendicular to the blade's axis than other knives and lacking a point, making penetration unlikely, spay points can be suitable for skinning.
 Spear Point Blade 8. A Westernised tanto style knife has a somewhat chisel-like point that is thick towards the point (being close to the spine) and is thus quite strong. It is superficially similar to the points on most Japanese long and short swords ( katana and wakizashi ). The traditional Japanese tanto knife uses the blade geometry of (1). The Westernised tanto is often straight but may also be gently curved. The point is actually a second edge on the end of the blade, with a total edge angle of 60 – 80 degrees. Some varieties may have the back edge angled to the point slightly and sharpened for a short distance from the point.
9. A sheepsfoot knife has a straight edge and a straight dull back that curves towards the edge at the end. It gives the most control, because the dull back edge is made to be held by fingers. Sheepsfoot knives are good for whittling and trimming sheep's hooves.
10. A Wharncliffe blade is similar in profile to a sheep's foot but the curve of the back edge starts closer to the handle and is more gradual. Its blade is much thicker than a knife of comparable size.
11. and 12. An ulu (Inuit woman's knife) knife is a sharpened segment of a circle. This blade type has no point, and has a handle in the middle. It is good for scraping, and sometimes chopping. It is the strongest knife shape. The semi-circular version appears elsewhere in the world and is called a head knife. It is used in leatherworking both to scrape down leather (reducing thickness), and to make precise, rolling cuts for shapes other than straight lines.
BLADE GRIND TYPES
1. Hollow ground—A common grind where a convex hollow is removed from both sides of the edge. It produces a very sharp edge but being so thin the edge is more prone to rolling or damage than other grinds. It is unsuited to heavy chopping or cutting hard materials. Straight razors are hollow ground. This grind is used extensively in mass produced knives.
2. Flat ground—The blade tapers all the way from the spine to the edge from both sides. A lot of metal is
 Common Blade Grinds 1
3. Sabre ground—Similar to a flat ground blade except that the bevel starts at about the middle of the blade, not the spine. It produces a more lasting edge at the expense of some cutting ability.
4. Chisel ground—As on a chisel only one side is ground (often at an edge angle of about 20 – 30°) whilst the other remains flat all the way to the spine. As many Japanese culinary knives tend to be chisel ground they are often sharper than a typical double beveled Western culinary knife. (A chisel grind has only a single edge angle. If a double bevel has the same edge angle as a chisel grind, it still has two edges and thus has twice the included angle.) Knives which are chisel ground come in left and right handed varieties, depending upon which side is ground.
5. Double bevel or compound bevel—A back bevel, similar to a sabre or flat grind, is put on the blade behind the edge bevel (the bevel which is the foremost cutting surface). This back bevel keeps the section of blade behind the edge thinner which improves cutting ability. Being less acute at the edge than a single bevel, sharpness is sacrificed for resilience: such a grind is much less prone to chipping or rolling than a single bevel blade. In practice, double bevels are common in a variety of edge angles and back bevel angles.
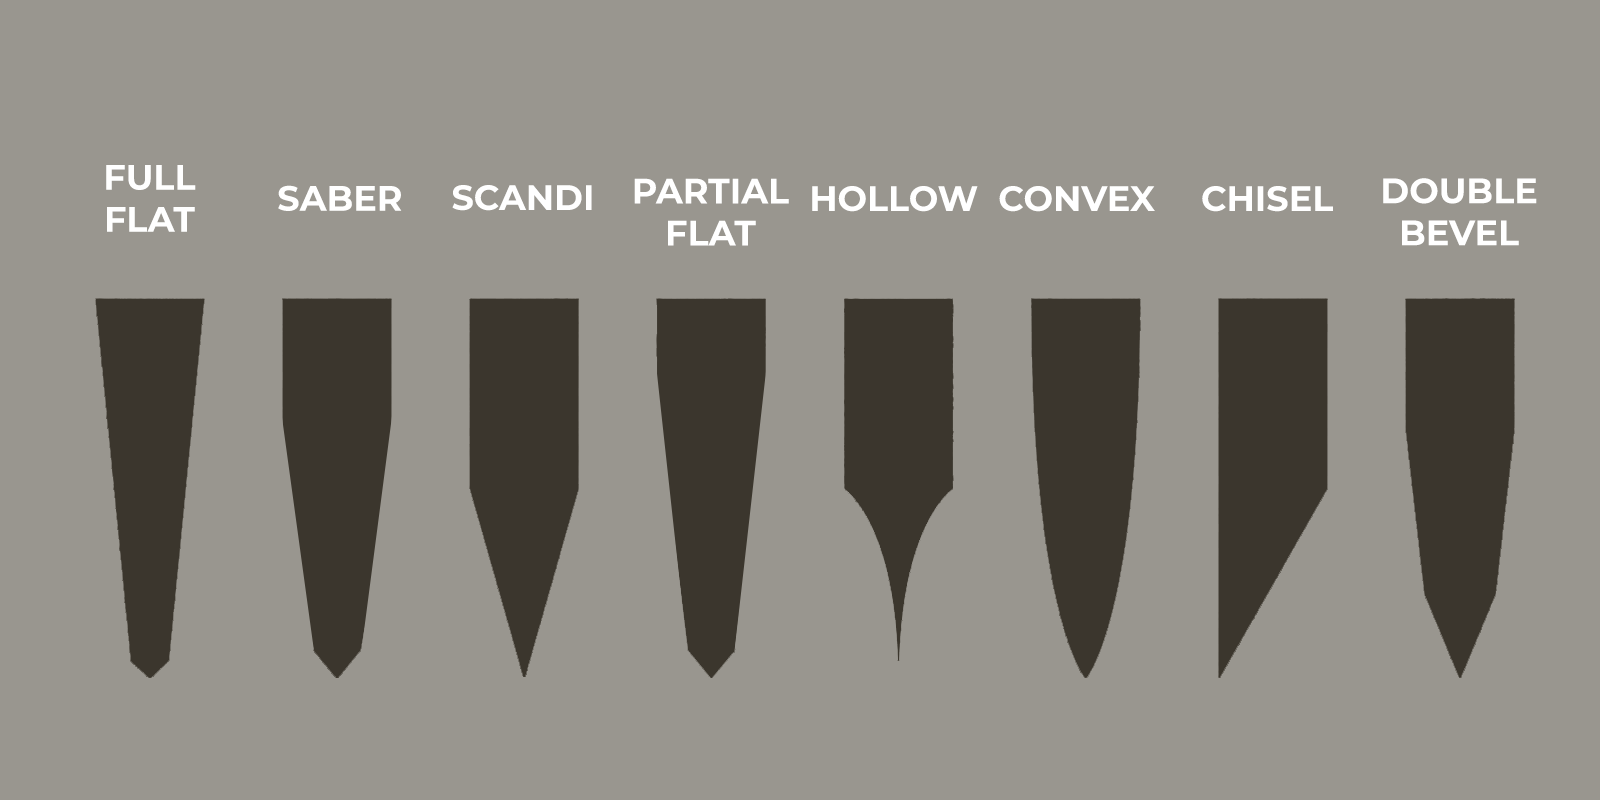 Common Blade Grinds 2 6. Convex ground—Rather than tapering with straight lines to the edge, the taper is curved, though in the opposite manner to a hollow grind. Such a shape keeps a lot of metal behind the edge making for a stronger edge while still allowing a good degree of sharpness. This grind can be used on axes and is sometimes called an axe grind. As the angle of the taper is constantly changing this type of grind requires some degree of skill to reproduce on a flat stone. Convex blades usually need to be made from thicker stock than other blades.
It is possible to combine grinds or produce other variations. For example, some blades may be flat ground for much of the blade but be convex ground towards the edge.
CHOOSING THE RIGHT BLADE STEEL
How To Choose The Right Blade Steel
 Steel Manufacturing There are many different types of steel available for knife blades. The first thing to do before you purchase a knife is determine how it will be used. Is it going to be a collector piece? Are you going to use it for hunting purposes? Will it be used around salt water when cleaning fish? Will it serve as a general purpose pocket knife? The reason that there are so many different types of blade steel is because it is not a “one size fits all” proposition. It is suggested to research the different blade steels that are available to find the one that is best suited for your intended use. And remember… the blade is where the work is done so choose wisely!
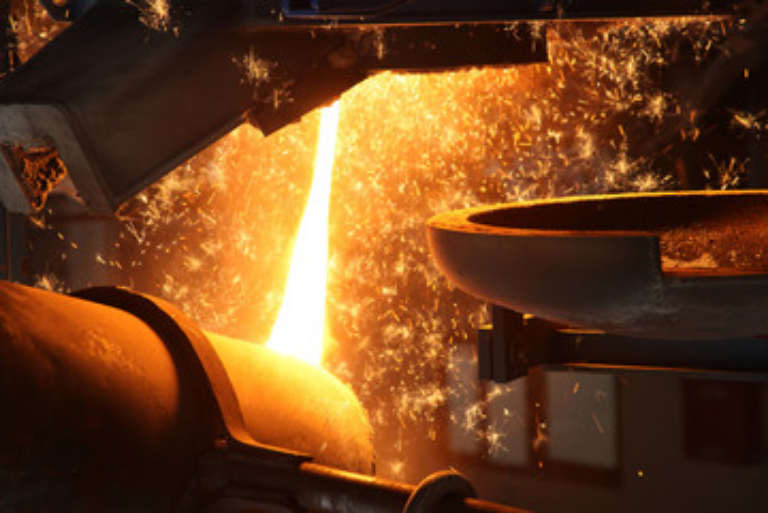
The Making & Shaping of Steel
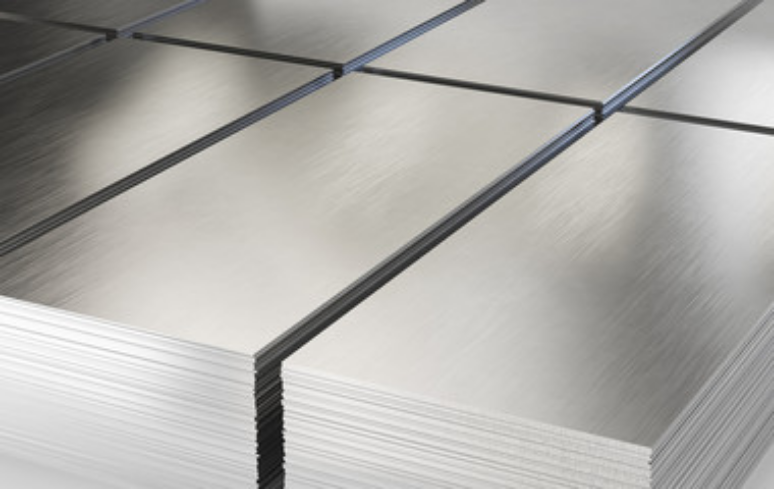
Steel is essentially a combination of iron and carbon. All steels contain certain other elements in small controlled amounts, like Manganese, Sulfur, Silicon, and Phosphorus. If nothing else is present, the steel is referred to as plain carbon steel. Steels used for knife blades are enhanced with additional elements and are called alloy steels. It is these additions that give different types of steel their special properties. Alloy steels that have additions to make them corrosion-resistant are labeled stainless steels, and these are the steels most frequently used in making knife blades.
The making of stainless steel begins by melting steel in a furnace. Alloying elements are added to the melt, and the molten steel is poured into molds called ingots. Once the ingots have solidified, they are processed in a mill to make usable shapes and sizes such as plates and coils. Plates are turned into knife components by laser cutting and coils are shaped into components using a fine blanking press.
Properties of Steel
The selection of steel for specific applications is based on the properties of the steel and other factors like manufacturability—if the steel is difficult to fabricate, then it is not practical for use in a manufacturing environment. These properties are established by the alloys added to steel and by the methods used in its manufacture.
Some of the important properties of blade steel are:
- Hardness: A measure of the steel's ability to resist permanent deformation (measured on a Rockwell Scale)
- Hardenability: The ability of a steel to be hardened (through the heat-treating process)
- Strength: The steel’s ability to resist applied forces
- Ductility: The steel's ability to flex or bend without fracturing
- Toughness: The steel’s ability to absorb energy prior to fracturing
- Initial Sharpness: The sharpness of the blade "out of the box"
- Edge Retention: The ability of the steel blade to hold an edge without frequent resharpening
- Corrosion Resistance: The ability of the steel to resist deterioration as a result of reaction with its environment
- Wear Resistance: The ability to resist wear and abrasion during use
- Manufacturability: The ease with which steel can be machined, blanked, ground, and heat-treated (made into a blade) Since no single material is superior in all property categories, manufacturers select materials that offer the optimum properties for the purpose intended.
 Steel Flat Stock Steel Nomenclature
The nomenclature used to describe the types of steel and their properties is often derived from the internal structure of metals. As steel is heated and cooled, its internal structure undergoes changes. The structures formed during these changes are given names like Austenite and Martensite. Martensite is a very hard structure that can be formed by rapidly cooling certain types of steel during heat-treating. Steels that are capable of forming Martensite are called martensitic steels, and it is this type of steel that is of most interest to the cutlery industry. S30V, BG-42, 154CM and 420HC are all martensitic stainless steels.
Alloy Additions
The properties of steel can be altered by the addition of certain elements to the steel during the melting process. The alloying elements that are important to knife-making are listed with a brief description of how they affect the steel's properties.
Carbon - is not an alloying element since it is present in plain carbon steels. Nonetheless, increasing carbon increases hardness.
Chromium - improves hardenability, wear resistance, and corrosion resistance. It is a major element in martensitic stainless steels, which are most commonly used for sports cutlery applications.
Molybdenum - improves hardenability, tensile strength, and corrosion resistance, particularly pitting.
Nickel - improves toughness, hardenability and corrosion resistance. Nickel is a major element in Austenitic stainless steel that is sometimes used for dive knives.
Vanadium - improves hardenability and promotes fine grains. Grain structure in steels is another important factor in wear resistance and strength. Generally, fine grain structures are desirable.
Some Popular Types of Steel
· A2 Tool Steel is a high carbon steel that is very tough and abrasion resistant. It responds very well to cryogenic treatment (see Knife Terminology) for maximum edge retention.
· 10-series -- 1095 (and 1084, 1070, 1060, 1050, etc.) Many of the 10-series steels for cutlery, though 1095 is the most popular for knives. When you go in order from 1095-1050, you generally go from more carbon to less, from more wear resistance to less wear resistance, and tough to tougher to toughest. As such, you'll see 1060 and 1050, used often for swords. For knives, 1095 is sort of the "standard" carbon steel, not too expensive and performs well. This is a simple steel, which contains only two alloying elements: .95% carbon and .4% manganese. 1095 High Carbon Tool Steel, is also known as “Cutlery Spring Steel”. This steel is well known for its use in manufacturing commercial saw blades and recognized for its cutting and edge holding ability. It hones to an unbelievable edge (better than any stainless steel), retains its edge (better than most stainless steels) , and easier to sharpen, (compared to stainless steel). Be aware, this steel will discolor over time and is susceptible to rust. It is recommended to keep the blade oiled, but discoloration and/or rust will not affect blade performance.
· D-2 is sometimes called a "semi-stainless". It has a fairly high chrome content (12%), but not high enough to classify it as stainless. It is more stain resistant than the carbon steels mentioned above, however. It has excellent wear resistance. D-2 is much tougher than the premium stainless steels like ATS-34, but not as tough as many of the other non-stainless steels mentioned here. The combination of great wear resistance, almost-stainlessness, and good toughness make it a great choice for a number of knife applications.
· 5160 is a steel popular with forgers and it is popular now for a variety of knife knowledges, but usually bigger blades that need more toughness. It is essentially a simple spring steel with chromium added for hardenability. It has good wear resistance, but is known especially for its outstanding toughness. This steel performs well over a wide range of hardnesses, showing great toughness when hardened in the low 50s Rc for swords, and hardened up near the 60s for knives needing more edge holding.
B. Stainless Steels:
· AEB-L steel is a steel developed by Uddeholm in Sweden for razor blades years ago and has now become very popular with knife makers. It is often a misunderstood steel in that it needs to be heat treated correctly to bring out its best characteristics and when done correctly, it performs on par with the new so called "super steels" at a much lower cost.
Many times you will hear people state that AEB-L steel is similar to 440B or 440A. The only similarities shared by AEB-L and 440B or 440A is the carbon content. Because of the fact that AEB-L has only 13% chromium by weight compared to 16-17% in 440A and 440B, the steels are quite a bit different. A stainless 52100 steel would compare more to AEB-L than to 440A or 440B.
AEB-L naturally forms what is called a K2 carbide which is the harder of the two chromium carbides of which K1 is the other. The K1 carbide is formed in steels such as 440C. The K2 carbide is about 79 on the Rockwell C scale as compared to 72 for the K1 carbide. The key for AEB-L steel is the heat treat. With proper heat treating, AEB-L produces fine, evenly distributed K2 carbides. AEB-L steel lands almost exactly on what is called the "Carbon Saturation Line". This means that all of the carbides formed are precipitated carbides, not primary carbides like form in 440C plus there is more carbon and a similar amount of chromium in solution as compared to 440C. Primary carbides are very large. So when you combine the proper heat treatment with its balanced composition, AEB-L has excellent toughness, edge retention, workability, ease of sharpening, and ease of polishing.
· 420 has a lower carbon content (<.5%) than the 440 series which makes this steel extremely soft, and it doesn't hold an edge well. It is used often for diving knives, as it is extremely stain resistant. Also used often for very inexpensive knives. Outside salt water use, it is too soft to be a good choice for a utility knife.
· 420HC is a stainless steel that provides excellent rust resistance, is easy to re-sharpen and has good edge retention. It is a higher carbon version of standard Type 420 martensitic stainless steel. The Carbon content, combined with the high Chromium content, provides good abrasion resistance and edge-holding. This steel is not to be confused with standard 420 stainless steel. 420HC is an excellent general purpose knife steel and is roughly comparable to 440A.
· 440A, 440B and 440C steels are some of the most popular stainless steels used today. The carbon content (and hardenability) of this stainless steel goes up in order from A (.75%) to B (.9%) to C (1.2%). 440C is an excellent, high-end stainless steel, usually hardened to around 56-58 Rc, very tough and with good edge-holding at that hardness. All three resist rust well, with 440A being the most rust resistant, and 440C the least. 440C is fairly ubiquitous, and is generally considered a very good general-use stainless, tougher and more stain resistant than ATS-34 but with less edge-holding and weaker. If your knife is marked with just "440", it is probably the less expensive 440A; if a manufacturer had used the more expensive 440C, he'd want to advertise that. The general feeling is that 440A (and similar steels, see below) is just good enough for everyday use, especially with a good heat treat . 440-B is a very solid performer and 440-C is excellent.
· 425M and 12C27 are very similar to 440A. 425M has .5% carbon. 12C27 has .6% carbon and is a Scandanavian steel that is used often in Finish puukkos and Norwegian knives. 12C27 is said to perform very well when carefully heat treated, due to its high purity. When done right, it may be a slighter better choice than 440A and similar steels.
· AUS-6, AUS-8, AUS-10 (aka 6A 8A 10A) are Japanese stainless steels, roughly comparable in carbon content to 440A (AUS-6, .65% carbon) and 440B (AUS-8, .75% carbon) and 440C (AUS-10, 1.1% carbon). AUS-6 is used by Al Mar, and is a competitor to low-end steels like 420J. Cold Steel's use of AUS-8 has made it pretty popular, as heat treated by Cold Steel it won't hold an edge like ATS-34, but is a bit softer (and therefore weaker) and tougher. 8A is a competitor of middle-tier steels. AUS-10 has roughly the same carbon content as 440C but with slightly less chromium, so it should be a bit less rust resistant but perhaps a bit tougher than 440C. It competes with higher-end steels, like ATS-34 and above. All 3 steels have some vanadium added (which the 440 series lacks), which will improve wear resistance and refines the grain for both good toughness, and the ability to sharpen to a very keen edge. Many people have reported that they are able to get knives using steels that include vanadium, like 8A, sharper than they can get non-vanadium steels like ATS-34.
· ATS-34 and 154-CM stainless steels. ATS-34 was the hottest high-end stainless in the 1990s. 154-CM is the original American version, but for a long time was not manufactured to the high quality standards knifemakers expect, so knifemakers switched over to ATS-34. CPM is again making high-quality 154-CM, and some companies seeking to stick with American-made products are using it. ATS-34 is a Hitachi product that is very, very similar to 154-CM. Normally hardened to around 60 Rc, it holds an edge very well and is tough enough even at that high hardness. Not as rust resistant as the 400 series above. Many custom makers use ATS-34, and Spyderco (in their high-end knives) and Benchmade are among the production companies that use it.
· VG-10 is another vanadium-containing high-end stainless steel. Due to the vanadium content, VG-10 takes a killer edge, just like other vanadium steels like BG-42 and AUS-8. VG-10 is also tougher and more rust-resistant than ATS-34, and seems to hold an edge better.
· BG-42 is somewhat similar to ATS-34, with two major differences: It has twice as much manganese as ATS-34, and has 1.2% vanadium (ATS-34 has no vanadium), so look for significantly better edge-holding than ATS-34. The addition of vanadium and the clean manufacturing process (VIM/VAR) also gives BG-42 better toughness than ATS-34.
· S30V is an excellent blade steel. It is a high vanadium stainless steel with even higher edge retention.
Steel makers follow a precise recipe to ensure that each time they make a particular alloy it has correct properties. The recipes are known as Specifications, and they specify the amount of each alloy. Each alloy recipe or type is named according to a number convention. Martensitic stainless steels, for example, have numbers like Types 410, 420, and 425.
What is Rockwell Hardness?
The hardness of steel or other metals is usually measured on a scale called the "Rockwell Scale", this scale gives a number value to the hardness. This number is preceded by the letters Rc (for example Rc58). High numbers indicate harder material. If a knife is too "soft" meaning it has too low a Rockwell hardness, it will probably not hold an edge and will bend quite easily. If a knife is too "hard" meaning it has too high a Rockwell hardness, it will probably be very brittle and difficult to re-sharpen. When a knife is designed, it is important to determine from the beginning what kind of hardness will be required for its ultimate purpose. This will affect the choice of steel. Once the steel is chosen, a heat treatment sequence must be devised to result in the exact hardness needed in the final knife. (See “Rockwell Hardness Test” in the Knife Terminology section)
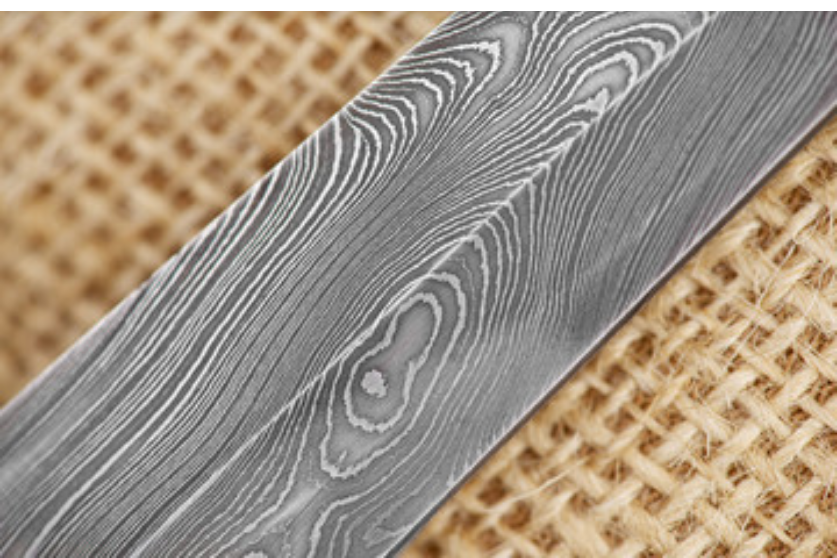
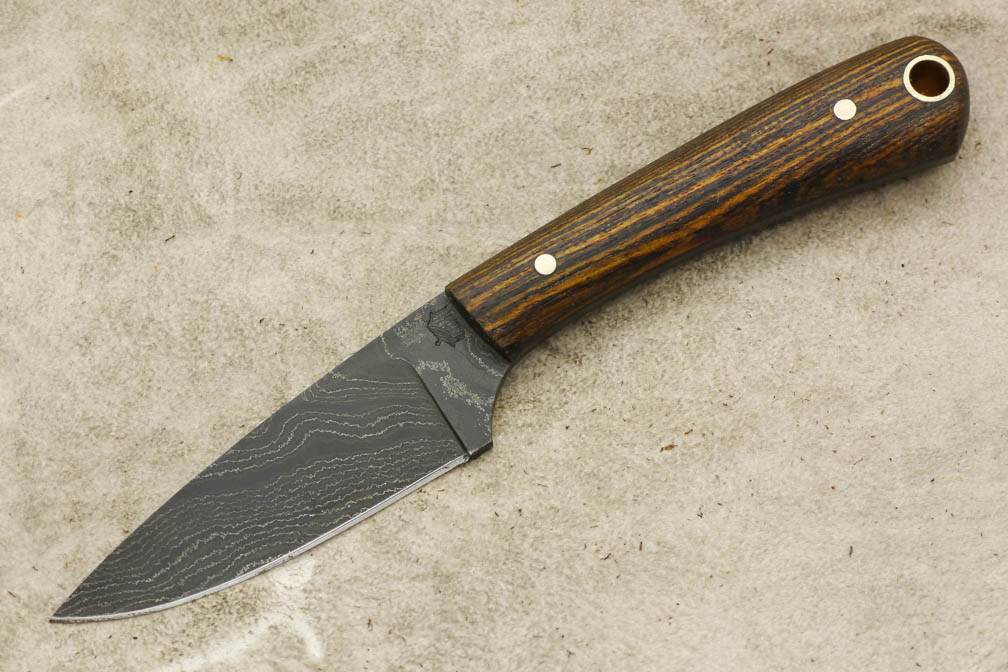
Damascus Steel Blades
Damascus steel blade knives are growing in popularity due to their beautiful looks, functionality and nostalgia. Collectors are drawn to the unique and very pleasing patterns that can be created with Damascus steel. The usefulness of Damascus steel blade knives is very attractive as well. The idea of welding layers of steel together can also be thought of as “laminated steel”. This is much like the concept of laminating wood which produces a stronger piece of material. Usually two or more different types of steel are used in the layers so the characteristics of each type will contribute to the necessary qualities that are desired for a high quality knife blade. A good quality Damascus steel blade will have all of the necessary features to provide a lifetime of excellent service… it can be sharpened to a very sharp edge, it will hold an edge very well and it will be tough. If properly taken care of, a good Damascus blade knife can be passed down from generation to generation. Producing Damascus steel blade knives is very labor intensive and it takes about 20 hours to produce one of good quality.
History
Historians have found that Damascus steel, formally known as Wootz steel, originated in Asia over two thousand years ago, (200 BC). Damascus steel gained popularity throughout the Roman era and was commonly used to make armor and weapons. Damascus steel regained its popularity in the mid 18th century when a Swedish scientist discovered that the original wootz steel contained carbon as the dominant element in the ancient steel. Swedish companies began reproducing Damascus steel on an industrial scale and began using Damascus steel to make gun barrels. Thus, the first crucible steel manufacturing began in 1774.
How a Damascus Steel Blade is Made
There are various techniques that bladesmiths and blacksmiths use to create Damascus knife blades. The following is a “snap shot” of a basic method for a fixed blade knife:
Making the Billet:
The process is started with five pieces of steel. Two high carbon pieces and three medium carbon pieces. (If forging a larger blade such as a sword, seven pieces may be used instead of five.) The thick ness, width and length of the pieces depends on the size of the blade that is being made. One of the me dium carbon pieces is made longer in order to handle the billet in the forge. Impurities are cleaned from the pieces of steel, then sandwiched together with the two high carbon pieces between the medium car bon pieces. The pieces are then tied together with wire or arc welded together on the end. The wire or weld material is removed after the first forge weld.
The Welding Process:
The billet is placed in a forge and brought to a cherry red color. It is then removed and covered with bo rax. The borax becomes fluid on the hot steel and acts as a flux to help clean the steel and keep it from oxidizing. The pieces are then hammered together with a hammer and anvil and/or a mechanical ham mer.
Drawing, Cutting, Folding and Welding:
The piece is then drawn out to twice the original length. Skill and care are very important at this step as the billet must be struck properly to avoid splitting. The billet is struck straight down to draw it out and not to "push" the steel out. The billet is heated several times during this process. The billet is then cut in the middle, leaving a little material to keep it together until the next weld. The billet is then turned on its side and hammered enough to swell the center of the billet. This provides a convex surface for welding. The billet is then folded back on itself. The billet is covered with Borax again and heated to welding temperature and then welded.
Repeating:
The draw, cut, fold and weld process is repeated the necessary number of times to achieve the desired number of layers. Starting with 5 pieces of steel, it requires 5, 6, or 7 times in order to obtain 160, 320 or 640 layers respectively. The more layers that there are, the more skill that is required for a good look ing and high quality blade.
Shaping:
Next the billet is hammered or cut and ground into the shape of the desired blade.
Heat Treating:
The blade is then heated to a orange-red color (1,400 to 1,500 degrees), then quenched in a quenching oil (sometimes a brine solution is used). The blade is then tempered by slowly heating to around 400 degrees.
Finishing:
The blade is then sanded multiple times using finer and finer grit. It is then polished and sharpened.
Etching:
The blade is then dipped in an acid bath. The acid reacts differently with the two steels which brings out the distinctive grain pattern.
The blade is now finished.
HANDLE MATERIALS
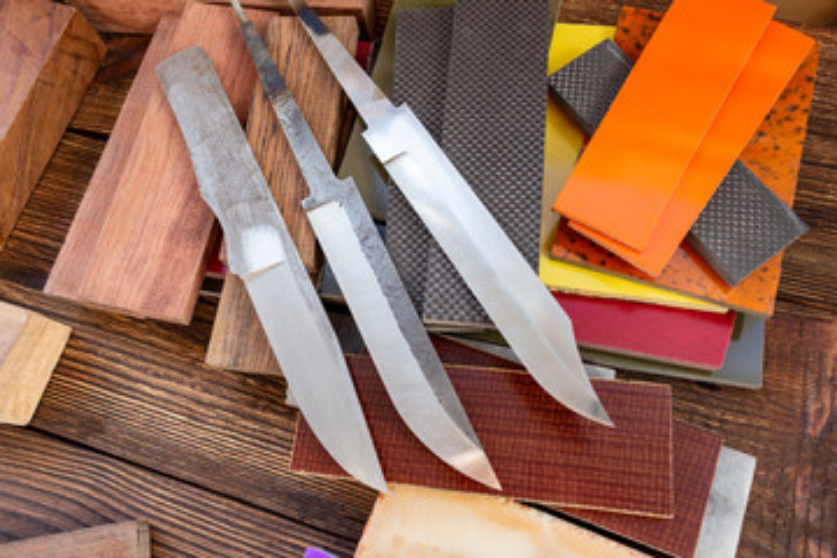 Blades with G10 & Wood Handle Material Knife handles have been made out of just about every type of material imaginable, ranging from the very weird to exceptionally nice looking and practical. There are many very good man-made and natural materials available today for knife handles. The purpose of the following list is to give you some idea of the more common types of knife handle materials that are used today. You may also enjoy a more detailed list.
Abalone - Abalone is a natural material from the shell of a mollusk that is harvested off of the coast of California, Mexico and other areas of the South Pacific. It has a very pleasing appearance but it is not as durable as some other knife handle materials. Its most popular use is for gentlemen’s pocket knives where it would not be exposed to the rough and tumble of heavy duty outdoor use. There is also an imitation abalone made from a type of plastic which is used mainly for pocket knife handles.
ABS - An amorphous thermoplastic terpolymer. The most amazing mechanical properties of ABS are resistance and toughness which are excellent qualities for knife handles. Used mostly for everyday working knifes.
Aluminum - Aluminum is very durable and provides a solid feel without the extra weight. It can be formed to provide a very comfortable and secure grip. The most common finishing process for aluminum is anodization which adds color and protection.
Bone - Bone used for knife handles is taken from naturally deceased animals. Bone handles are usually given a surface texture for better grip and added beauty. Jigging is the most common way to produce the surface texture on the bone and it is done using a special jigging machine in which modified bits cut out pieces of bone. The machine operates in a rocking motion to produce the particular desired pattern. Each of the patterns has its own distinguished look. After the bone is jigged, it can be dyed in variety of colors. Bone is a very good material for knife handles as it is durable, fairly easy to shape and can be very attractive. It is one of the most common handle material used for pocketknives.
Black Mother of Pearl - Blacklip Mother of Pearl is one of the most exclusive pearls in demand in today's knife market. It comes from small shells found in French Polynesia around Tahiti and its Archipelagos. Just under the exterior bark of the shell is where the real beauty of the Blacklip shell lies. It is very similar to abalone from the standpoint of durability and uses
Carbon Fiber - Carbon Fiber is composed of thin strands of carbon that are tightly woven in a weave pattern and set in resin. Carbon fiber is probably the strongest of all the lightweight synthetic handle materials. The main visual attraction of this material is the characteristic of the carbon strands to reflect light which makes the weave pattern very visible. Carbon fiber is a labor-intensive material which results in a rather expensive knife. It is a very good knife handle material… if you want to spend the money for it.
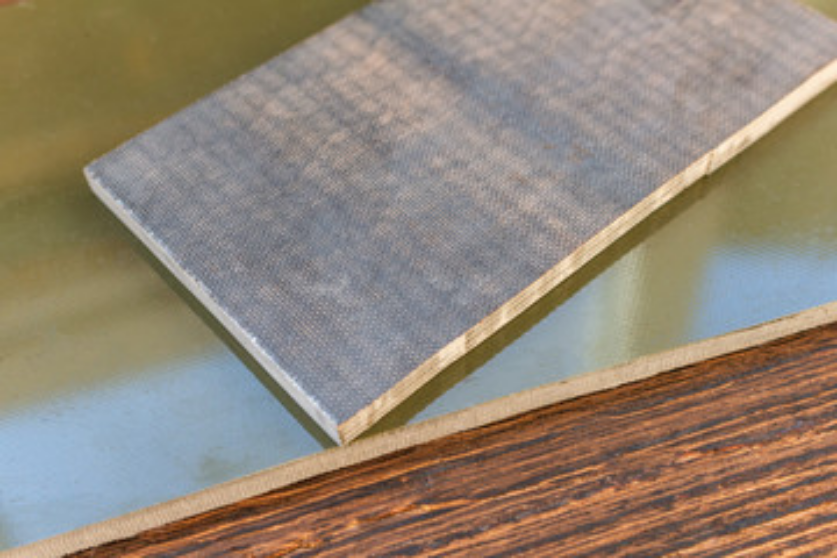
G-10 - G-10 is a fiberglass based laminate. Layers of fiberglass cloth are soaked in resin, compressed and then baked. The resulting material is very hard, lightweight, and strong. Surface texture is added in the form of checkering or other patterns. It is an ideal material for tactical folders and fixed blade knives because it is durable and lightweight. It is available in a variety of colors.
Leather - Leather handles are seen on some hunting and military knives. Leather handles are typically produced by stacking leather washers, or less commonly, as a sleeve surrounding another handle material. Leather knife handles are attractive to look at but are not as durable as some other materials. Leather works well as spacers to add accents to a knife handle.
Micarta - Micarta is similar in construction to G-10. Layers of either linen cloths, canvas, or paper are soaked in a phoenolic resin. Heat and pressure is applied to the layers which causes a chemical reaction (polymerization) transforming the layers into a high-pressure thermosetting industrial laminated plastic. The end result is a material that is lightweight and strong. Micarta is a popular handle material on user knives due to its extreme toughness and stability. Micarta has come to refer to almost any fibrous material cast in resin. It is available in a variety of laminate materials and colors.
 Handle Slab Material Stag - Stag is another material that is extremely popular. Of all of the deer species, Sambar Stag antler material is the most sought after for knife handles because it is more dense than the others. Most Sambar Stag comes from India and due to the government ban on its export, it is becoming more and more costly and rare. The charm of stag comes from the attractive looks and rough texture of the surface that gives a nice grip for the user. Another intriguing thing about stag knife handles, is that, since it is a natural material, no two knives will be alike. Stag is derived from naturally shed deer antlers. When exposed to open flame, stag takes on that slightly burnt look. Sambar Stag is very durable and it makes excellent knife handle material.
Stainless Steel - Stainless steel offers durability and of course corrosion resistance when used for knife handles. It is quite often used in combination with another material such as plastic or rubber to make it easier to grip. The biggest drawback to stainless steel knife handles is the weight.
Titanium - Titanium is a metal known to be harder but lighter than steel. While stainless steel handled knives are usually on the heavy side, titanium provides the toughness and durability of a metal handle without so much weight. Titanium offers the most corrosion resistance of any steel. It has a good “feel” and makes an excellent handle material.
White Mother of Pearl - A highly prized knife handle material! White Mother of Pearl comes from the silver lip shell. Some of the best White Mother of Pearl comes from the South Seas of tropical Australia. It is very rare in sizes large enough to use for knife scales. It is said that it takes 10 tons of pearl shells to find material large enough to cut scales of 1/10” x 4 1/2” long. It is also very similar to abalone from the standpoint of durability and uses.
Wood - Wood knife handles vary from the more common wood species to the most exotic and the price ranges accordingly. Soft or fine woods like black walnut are not good choices for hunting knife or for uses that involve a lot of moisture or water. Hardwoods like Rosewood, oak and maple make good choices for hunting knives. Stabilized wood like spalted maple, mesquite and desert ironwood are available where the wood is impregnated with plastic making it entirely waterproof and providing it with a durable finish that does not require any maintenance except an occasional buffing. These are highly recommended for tough duty knives and those that would be exposed to a lot of moisture. Fancy and exotic wood handled knives are especially popular with collectors. A good quality wood handle will be durable and can be attractive as well.
Zytel - Zytel nylon is thermoplastic material developed by DuPont. Zytel is an excellent material for work knife handles since it is virtually unbreakable and very abrasive resistant. It is one of the least expensive of synthetic handle materials to produce, thereby holding down the cost of the knife. It is quite often given a surface texture to improve gripping when used for knife handles.
There are many other materials used to make knife handles as well such as various types of plastics and exotic materials such as: mammoth tooth and ivory, warthog tusks, stone, oosic (walrus penis bone), sheep and buffalo horn etc. Almost any hard material can (and has been) used as a knife handle.
KNIFE TYPES
 Fixed Blade Knife (Solid Tang) Fixed Blade Knives
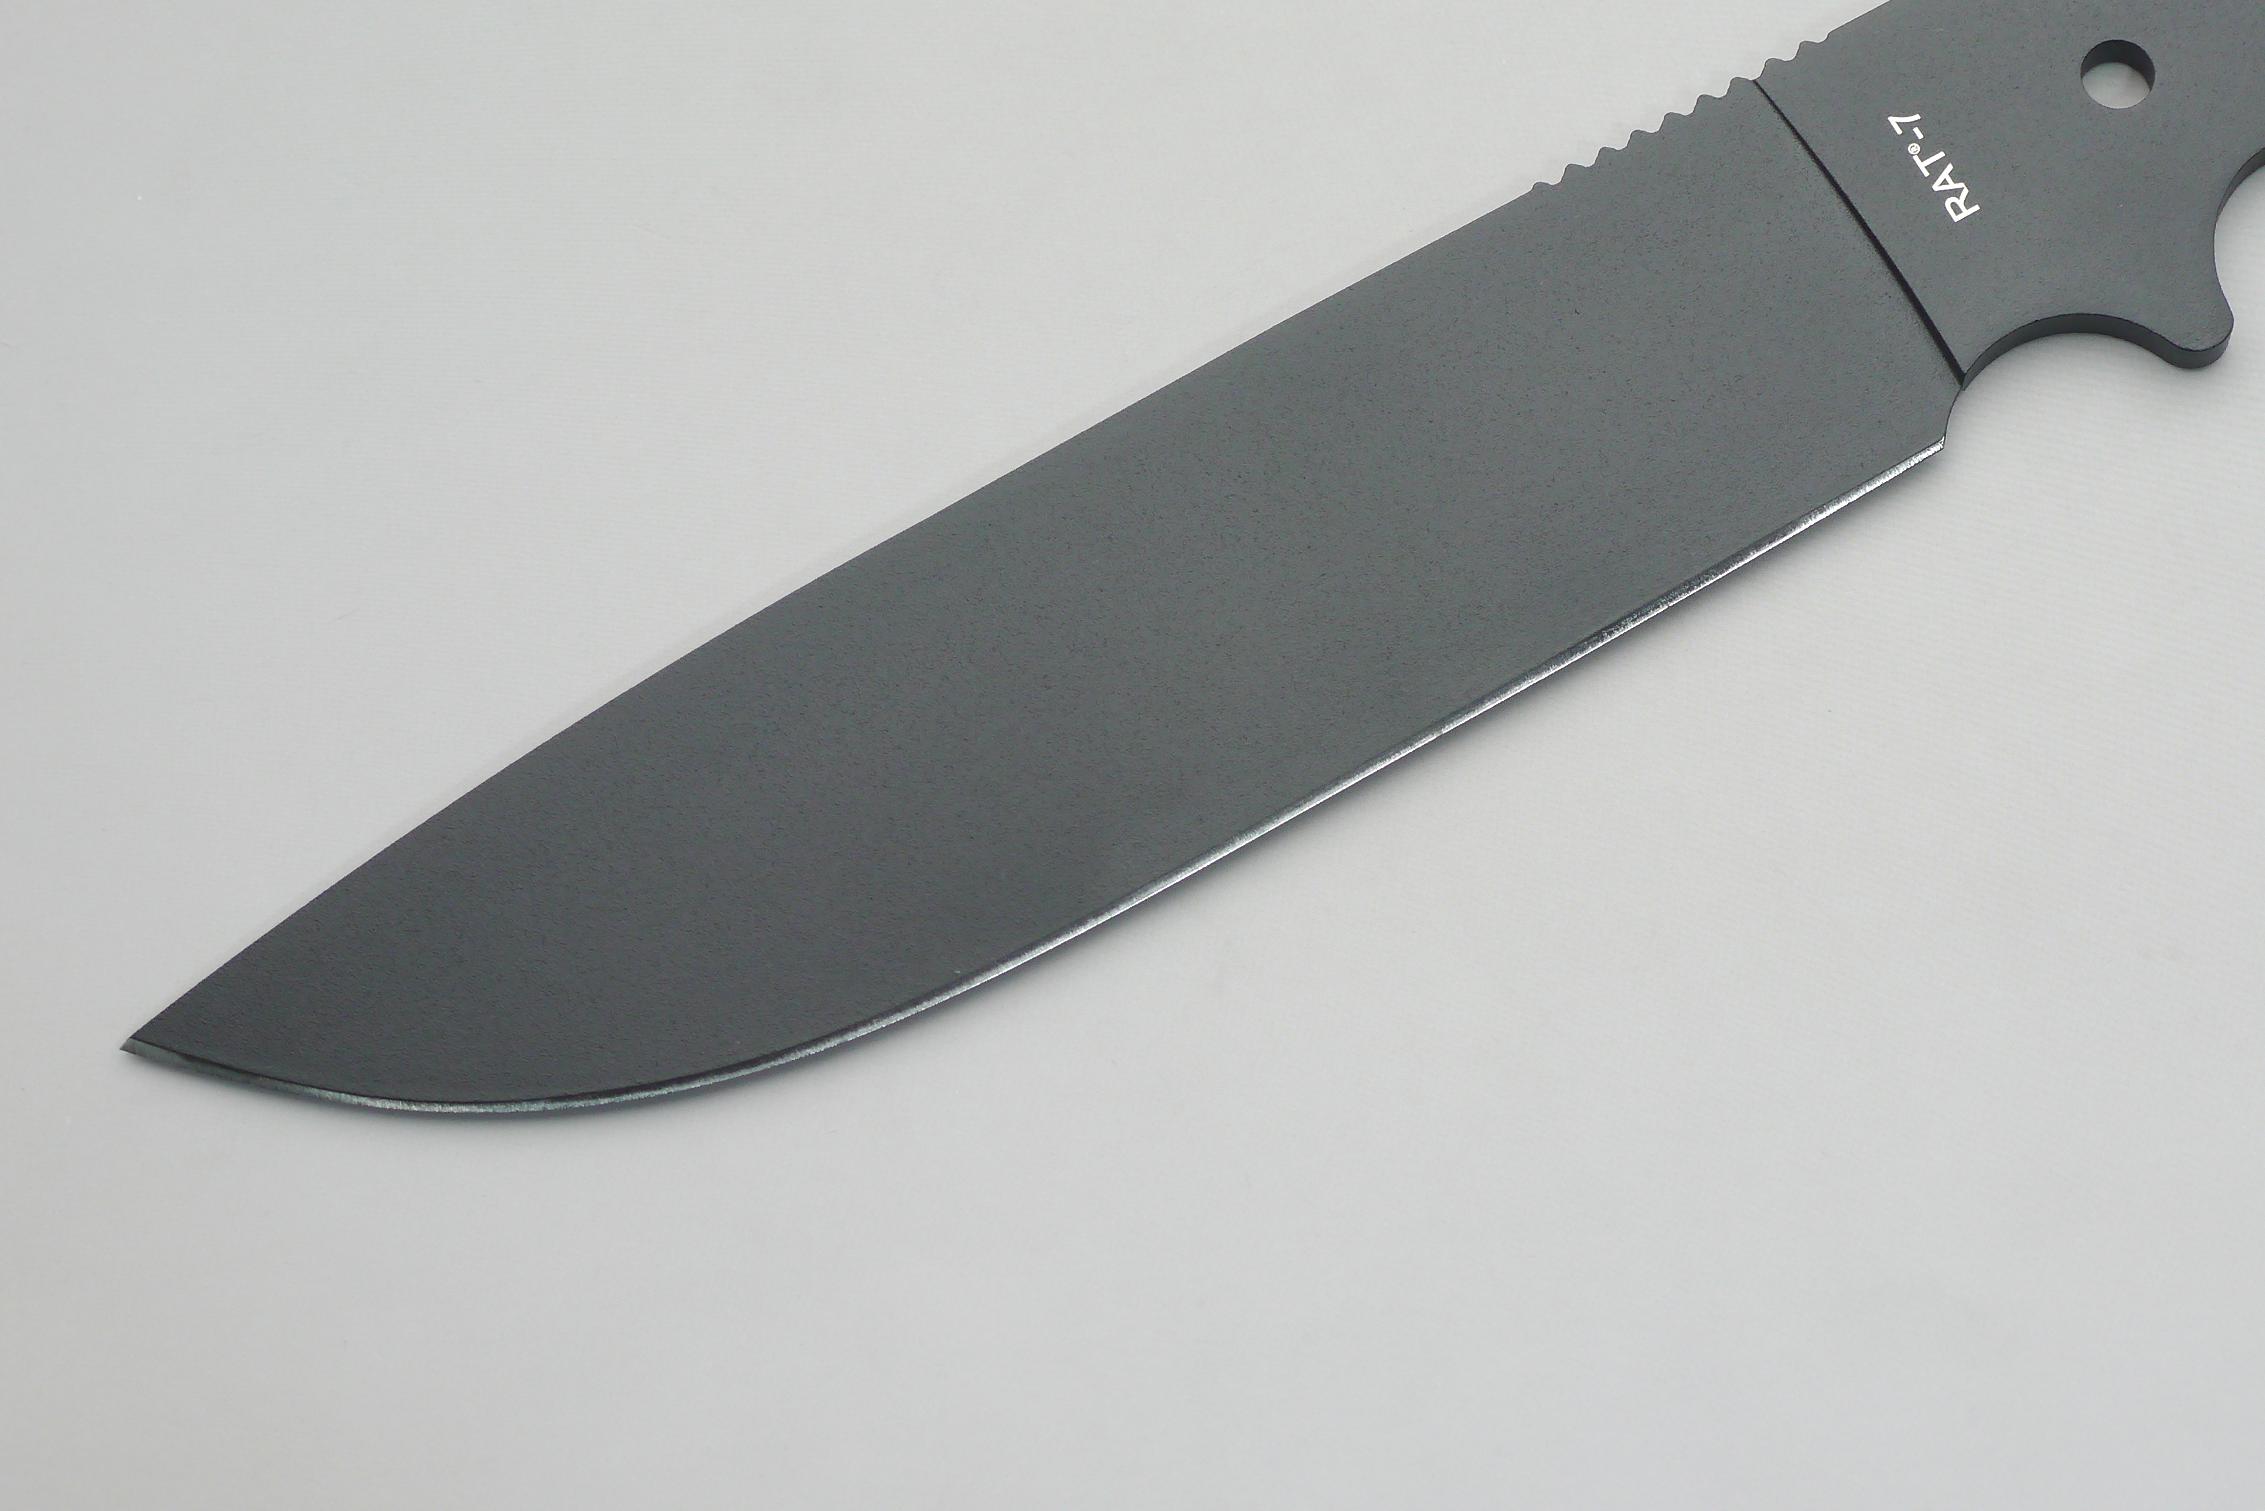
A fixed-blade knife will never surprise you in use because it is a solid piece of steel anchored to the handle. For those who want a blade they really trust for tough jobs, such as field dressing and tough camping tasks, a fixed blade is the answer. Fixed blades are durable and hold up to the elements well because of their straight, simple construction without folding mechanisms. In fixed blade knives, the blade is one piece of metal that runs the length of the knife. When the blade reaches the beginning of the handle,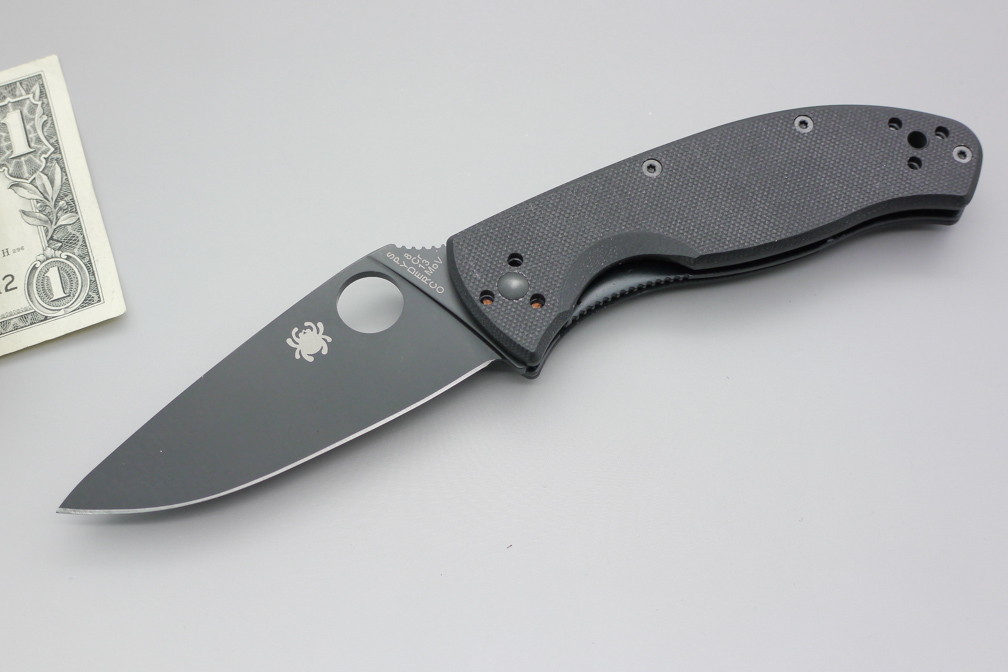 Folding Blade Knife it can either taper into a rat-tail that is surrounded by the handle or not taper and continue as a tang that is covered on either side by handle "slabs." The Bowie knife is a very popular type of a fixed blade knife.
Folding Knives
Folding knives are generally not quite as durable as fixed blade knives, but provide safety and the carrying convenience of compact size. Folding blade knives come in a variety of configurations, some of which lock into place. Locking folders allow much of the same confidence of a fixed-blade while letting you close the blade into the handle for safety. The blade(s) on a folding knife pivots on one or both ends of the knife depending on the design. Different locking mechanisms are favored by various individuals for reasons such as perceived strength (lock safety), legality, and ease of use.
Locking Mechanisms
Popular folding knife locking mechanisms include:
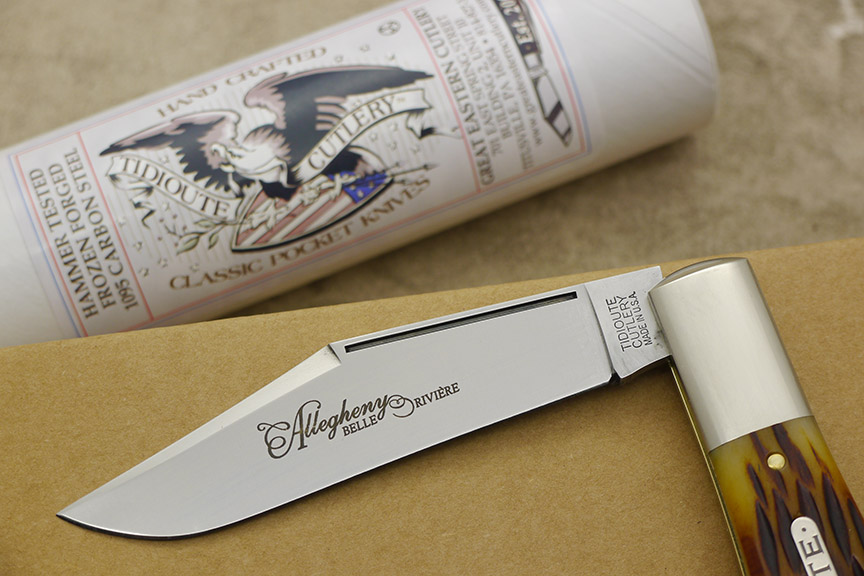 Slip Joint Design Slip-Joint - Found most commonly on traditional pocket knives, the opened blade does not actually lock in a solid position but is held in place by a spring device that allows the blade to fold if a certain amount of pressure is applied.
Lockback - A "Lockback" is a type of folding knife that locks open. Locking folders provide much of the confidence of a fixed-blade while open, yet enable you to fold the blade for safety and carrying convenience. A Lockback gets its name from a rocking lock plate visible on the back of the handle. Opening the blade causes the "rocker" to lock against the blade so it locks open. Pushing down on the rocker at the back of the handle releases it and enables you to close the blade. Lockbacks require two- hand closing, though some are one-hand openers.
Liner Lock - The “Liner Lock” is one of the most common today on knives, especially so-called "tactical" folders. Its main advantage is that it allows one to disengage the lock with one hand. It con sists of a liner bent so that when the blade opens, the liner presses against the rear of the tang, prevent ing it from swinging back. To disengage, you press the liner to the side of the knife from where it is attached to the inside of the scales.
Frame Lock - A "Frame Lock" operates like a liner lock, only the lock is a tensioned part of the handle frame with an open channel. When the blade opens, the frame lock moves into the handle opening and locks against the blade. Pushing to the left releases it from its "locked" position so you can close the blade.
Choosing what lock type is best will be determined by your preference, as well as the type of work you plan to do. For example, if you want to be able to operate the knife with one hand, you will probably not want a Slip-Joint or Lockback. A Liner Lock or Frame Lock will be the better choice.
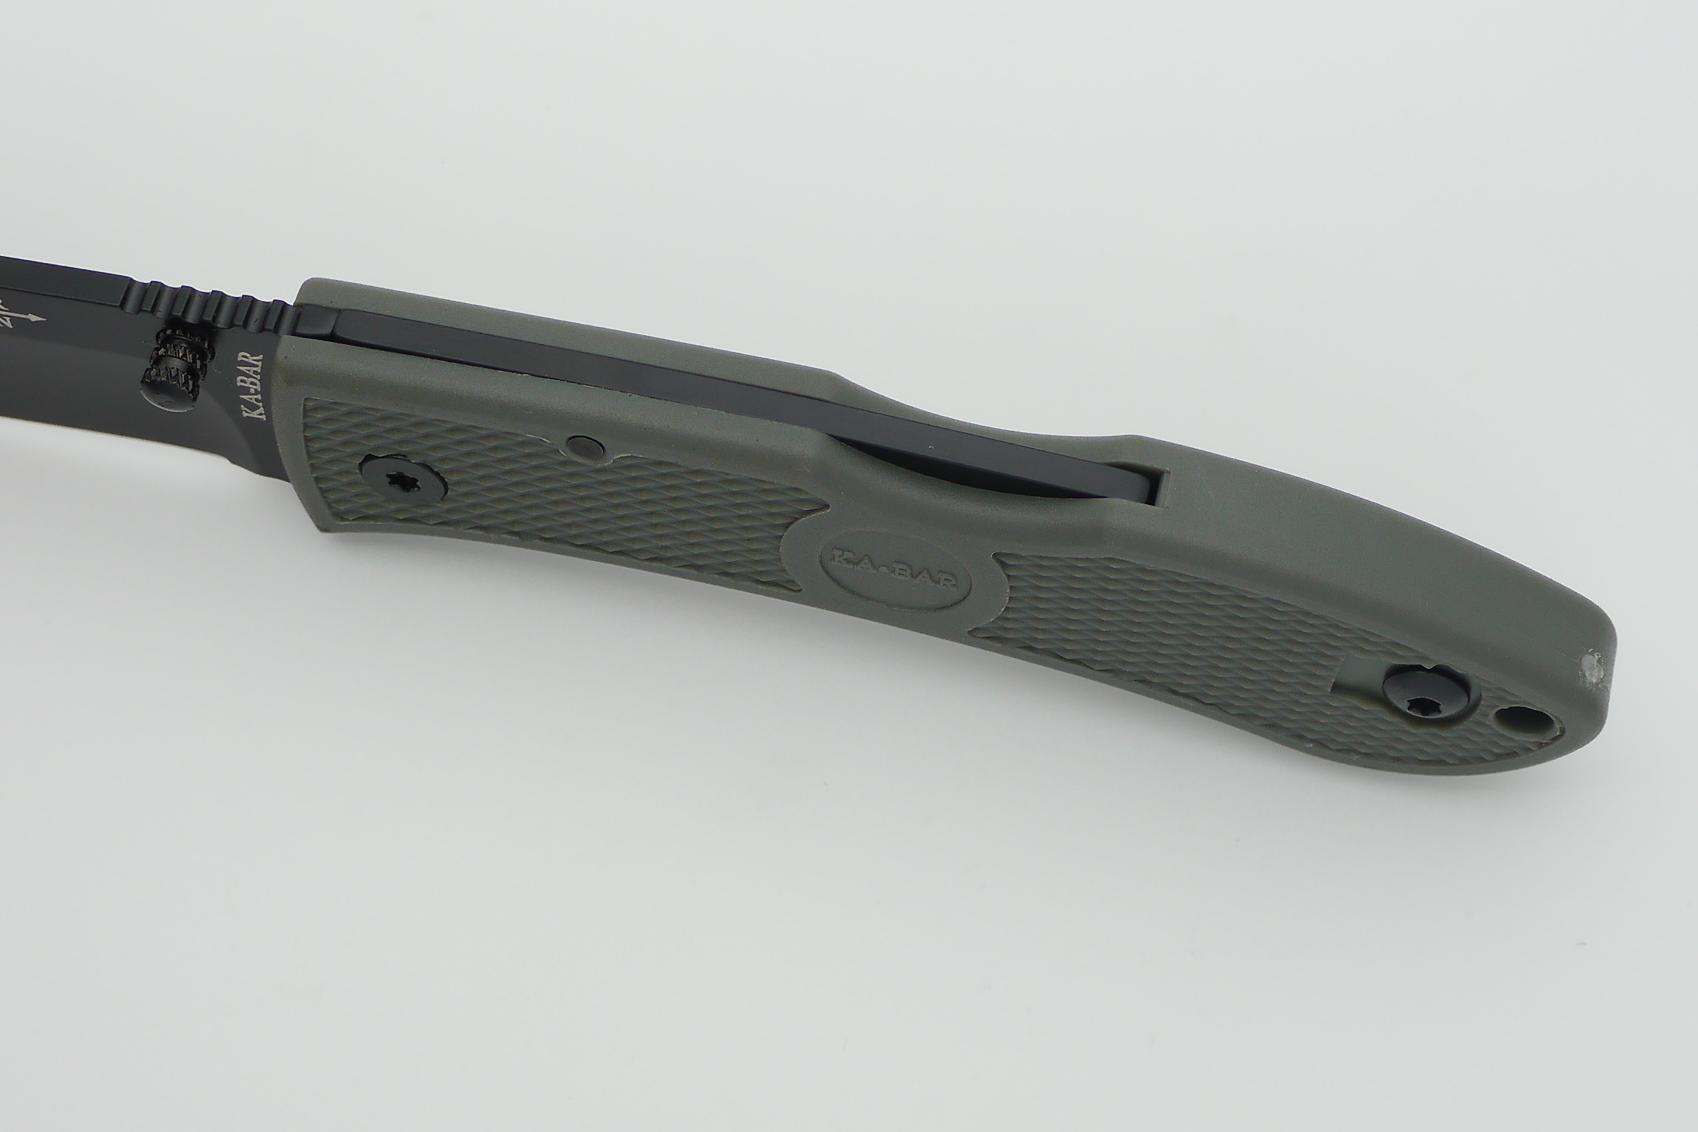 Lockback Design
  Liner Lock Design
 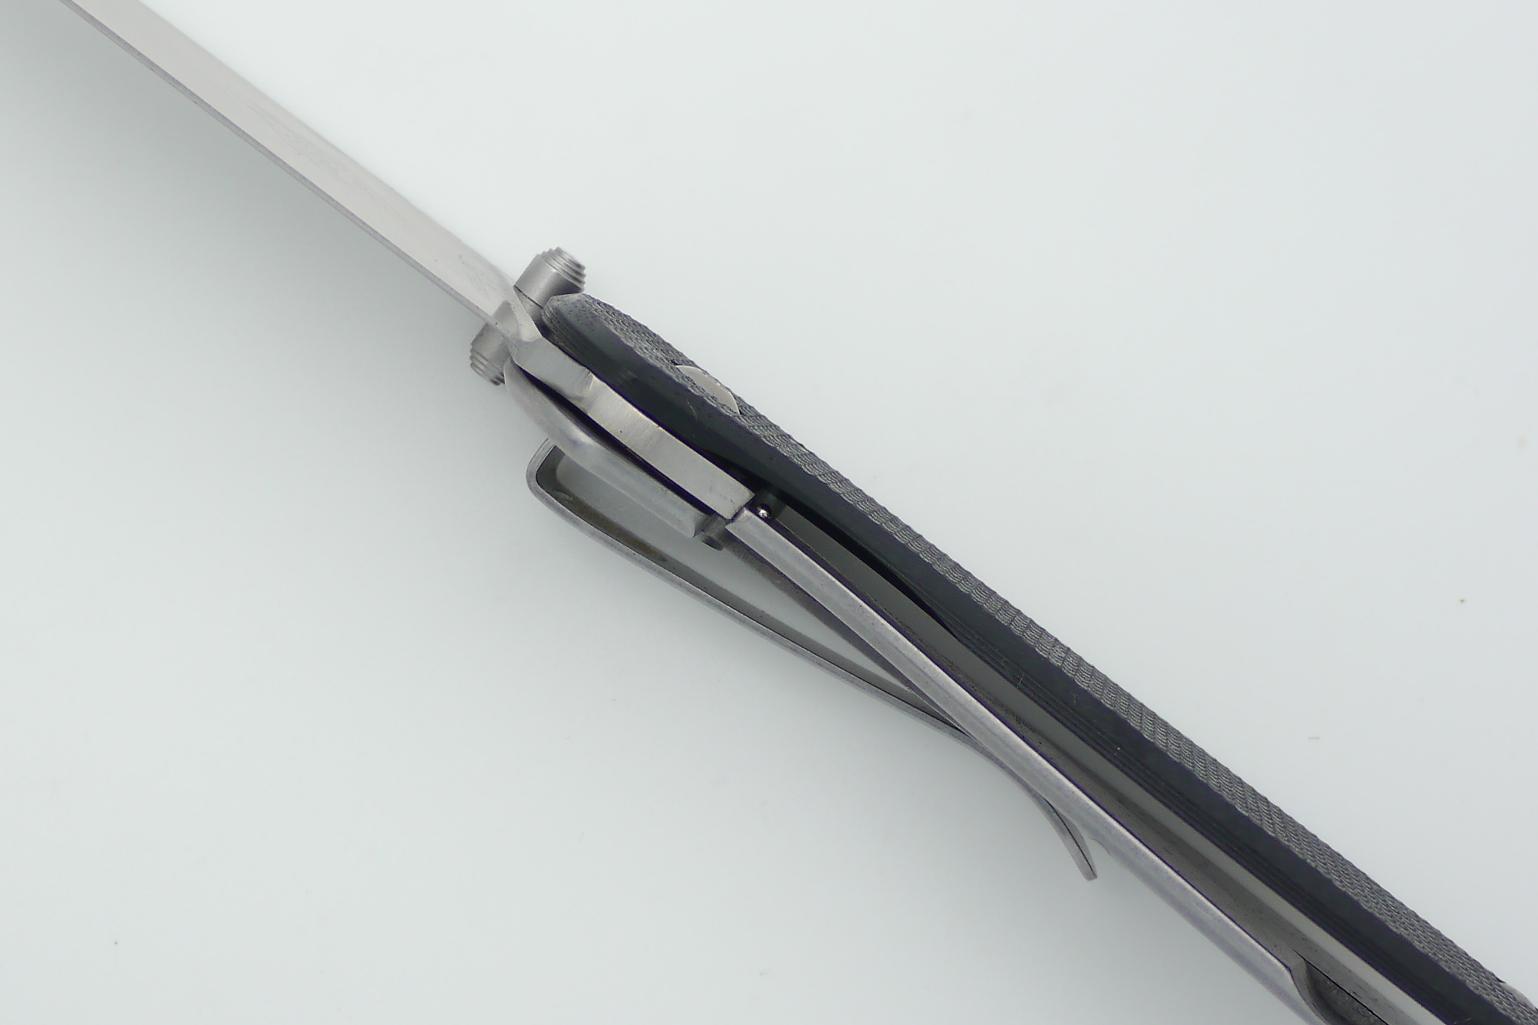 Frame Lock Design